You’ve snapped a memorable photo with your phone. There’s only one problem — you don’t like the background. Well, that’s easily fixed, at least with the Photos app built into Windows 10 and Windows 11.
Also: How AI can turn any photo into a professional headshot
The tool’s latest AI smarts mean you can blur, remove, or replace the background. You can also control the intensity and other elements of modifications, while a preview shows you what the photo will look like before you apply your changes.
Like any AI, though, the background tool isn’t perfect. It can have trouble distinguishing between the foreground and background depending on the image, colors, shadows, and other elements. But you can manually fine-tune the selection if the AI doesn’t get things right.
Here’s how this tool works.
How to change an image background in Windows Photos app
Microsoft added the AI-powered background tools to the Photos app in Windows 11 with version 23H2 released in September 2023 and to the app in Windows 10 in February 2024.
Also: Want to keep getting Windows 10 updates next year? Here’s what it will cost
To confirm that you’re running the latest version of either OS, head to Settings > Windows Update > Check for updates. Allow any available updates to install.
Next, make sure you have the latest version of the Photos app. Open the Microsoft Store app, click the Library icon, select Get updates, and then click Update all. This will update all your Microsoft Store programs, including the Photos app.
Launch the Photos app from the Windows 10 or 11 Start menu or the All Apps screen, and then open the photo you want to tweak. Click the “Edit image” button (the first icon on the top toolbar). At the editing screen, click the Background icon (the last icon on the top toolbar).
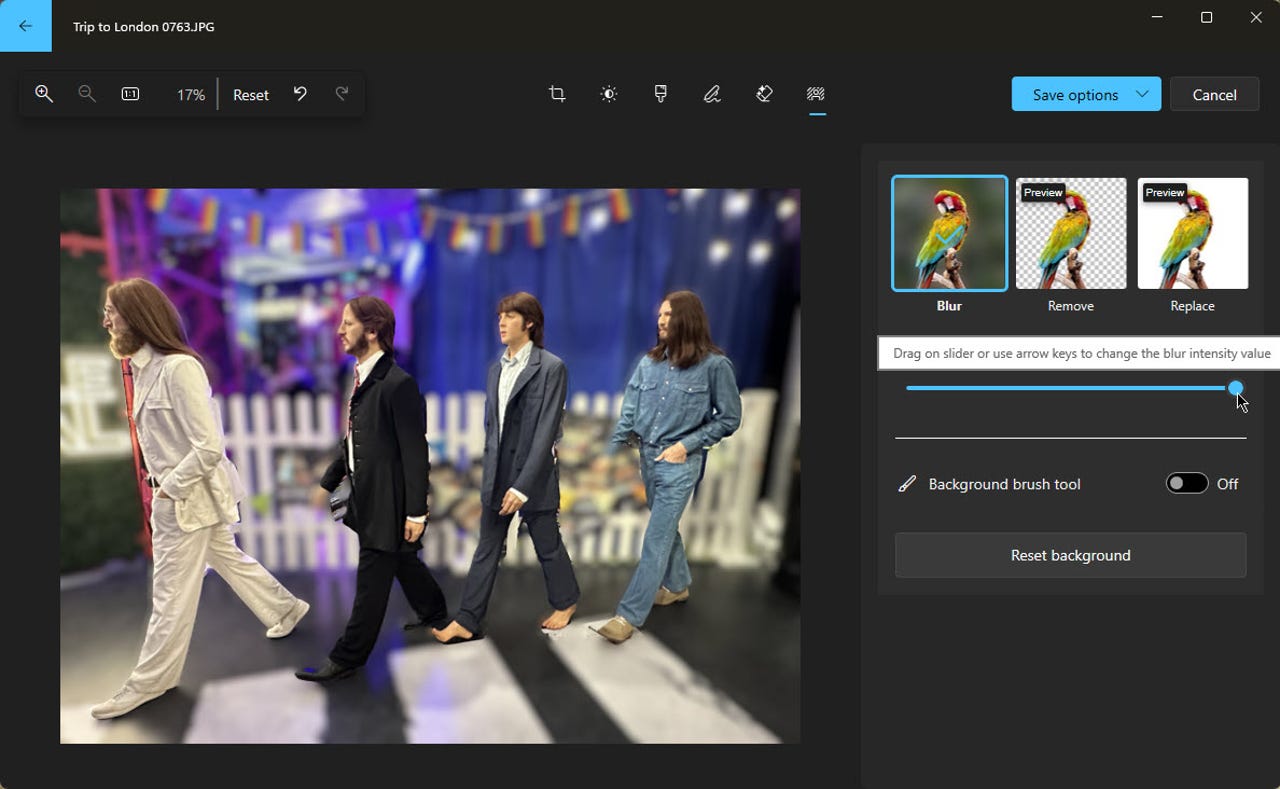
You’re placed in the Background screen with three choices — Blur, Remove, or Replace. To start, click the Blur button. Move the slider to the right to increase the blur and to the left to decrease it.
If the AI inadvertantly blurs parts of the foreground or fails to blur parts of the background, you can manually adjust the mask. Turn on the switch for “Background brush tool.”
Also: How to resize images and photos quickly and easily
Click “Add Mask” to paint and blur any area of the background that the AI failed to blur. Click “Remove Mask” to paint any area of the foreground that the AI blurred but which should remain in focus. Choose the brush size and softness and then paint the area.
When done, turn off the switch for “Background brush tool” to see the difference.
You can undo your last action at any point by clicking the Undo icon on the toolbar. If you wish to undo all the changes you’ve made to your photo, click the Reset button. You can also click the “Reset Background” button to remove any background edits you’ve made.
To remove the whole background, click the Remove icon. The background is then cleared.
If the AI removes parts of the foreground or fails to remove parts of the background, you can manually adjust the mask. Turn on the switch for “Background brush tool.”
Click “Add Mask” to paint and remove any area of the background that the AI failed to remove. Click “Remove Mask” to paint any area of the foreground that the AI removed but which should remain visible. Choose the brush size and softness and then paint the area.
When done, turn off the switch for “Background brush tool” to see the difference.
Next, you’re able to replace the background with a single color. Click the Replace button. Drag the slider left or right to choose the basic color you want. Then move the cursor on the square to select the shade you wish to apply.
If the AI replaces parts of the foreground or fails to replace parts of the background, you can manually adjust the mask. Click the Remove icon again and turn on the switch for “Background brush tool.”
Also: How to resize images and photos quickly and easily
Click “Add Mask” to paint any area of the background that should be replaced. Click “Remove Mask” to paint any area of the foreground that should be not be replaced. Choose the brush size and softness and then paint the area.
When done, click the Replace icon again and turn off the switch for “Background brush tool” to see the difference.
After you’ve made the necessary background changes, it’s time to save your photo. Click the “Save Options” button at the top. From the menu, select “Save as Copy” to save a copy of the photo without affecting the original.
Also: Google Photos users will soon get the best AI editing tools
Select Save to overwrite the original with the edited version. You can also select “Copy to Clipboard” to copy and paste the photo into another application or file.
More how-tos
